Under IRR17, employers must ensure all PPE is thoroughly examined at suitable intervals and properly maintained. Annual inspection is the minimum recommended standard.
Section - 01
Legal Requirements & Employer Duties
Radiation protection PPE sits at the intersection of several pieces of UK legislation. Understanding your obligations is the foundation of a compliant department.
Ionising Radiations Regulations 2017 (IRR17)
Requires employers to restrict radiation exposure SFARP, ensure all PPE complies with the PPE Regulation (EU) 2016/425 and meets BS EN 61331-3 standards, and provide adequate storage for all protective garments.
01
Health & Safety at Work Act 1974
Places a general duty on employers to ensure, so far as is reasonably practicable (SFARP), the health and safety of their employees, including provision of safe equipment, systems of work, and a safe working environment.
03
PPE Regulation (EU) 2016/425 & BS EN 61331-3
All aprons, thyroid collars, gloves and eyewear must meet Basic Safety Standards set by BS EN 61331-3 (2014): Protective clothing, eye wear and protective patient shields. Lead equivalence must be clearly labelled.
IRR17 - Inspection Requirement
UK legislation (IRR17) requires that all PPE provided should be thoroughly examined at suitable intervals and properly maintained. The BIR recommends lead aprons are inspected at least once a year. Manufacturers additionally recommend that newly purchased aprons are radiographically assessed before first use to rule out manufacturing defects not visible to the naked eye, and damage during transportation.
Section - 02
Selecting the Right Protection
Appropriate selection requires a formal risk assessment with the involvement of a Radiation Protection Adviser. Not all aprons suit all procedures.
RA
Radiation Risk Assessment First
An IRR17 radiation risk assessment, completed with a Radiation Protection Adviser, should outline the necessary PPE, including the required lead equivalence and the specific type of protective clothing needed for each work activity.
LE
Lead Equivalence & Beam Quality
Aprons are tested under broad-beam conditions for tube voltages from 60–120 kVp.
Where exposure exceeds 125 kVp, the PPE must meet or surpass lead equivalent values for radiation quality at 150 kVp.
Always verify the LE marking on every garment.
FIT
Correct Sizing Matters
Wearing an apron that is too small for the wearer creates undue stress at the seams, one of the most common causes of cracking and premature garment failure.
Correct fit also ensures organs at risk are properly covered throughout a procedure.
Having the correct lead apron drastically reduces the effect of MSK strain

Organs at Risk - Sensitivity Reference
Medium–High Sensitivity (0.08)Gonads
Medium Sensitivity (0.04)Bladder, oesophagus, liver, thyroid
Lower Sensitivity (0.01)Bone surface, brain, salivary glands, skin
Source: ICRP Report 103 (2007).
Tissue weighting factors as cited in BIR PPE Guidance. Link
Higher Sensitivity (0.12) Bone marrow, colon, lung, stomach, breast.
Section - 03
Wearing Your Apron Correctly
How an apron is worn is as important as its specification. Poor wearing technique compromises protection and accelerates garment wear.
Check Before Wearing
Carry out a brief visual check each time. Look for obvious damage to the outer covering, seams and fastenings. Do not use a garment that appears damaged.
Confirm Lead Equivalence
Check the garment label to confirm it carries the correct LE for your procedure. Front and back LE may differ, verify both are appropriate.
Correct Fit & Fastening
Fasten all velcro, buckles or ties securely. An unsecured apron will shift during a procedure, leaving organs exposed to scattered radiation.
Return It Properly
After use, hang on a dedicated wide apron hanger. Never fold or drape over a hook this causes internal cracking of the protective material.
Section - 04
Inspection: Visual & Radiographic
Inspection must be a two-stage process. Visual inspection alone is insufficient - internal defects require radiographic assessment.
Stage 1 - Visual Inspection
Lay flat on a clean surface
Inspect all seams and outer covering for damage, wear or discolouration.
Check all fastenings
Test velcro, buckles and ties. Confirm all are in proper
working order and hold the apron securely in position.
Palpate the surface
Run hands across entire surface. Feel for lumps, cracks,
signs of separation at seams, or sagging of internal core
material.
Record the result
Log pass, flag for X-ray, or remove from service against
the garment's asset record immediately.
Stage 2 - Radiographic Inspection
Choose your method
Fluoroscopy, CT scout views, or purpose-built apron screening systems. Purpose-built systems produce consistent reports. - Consider room availability, tube wear and tear.
Set exposure factors carefully
BIR recommends 70–80 kV, low mA. For CT scouts, check
pixel resolution, it may alter with scout length, and could mask defects. Your
Be mindful of post-processing algorithms
Remove edge enhancement before reviewing. Modern
systems may flag manufacturing tolerances as defects.
Use stitch holes to calibrate window/level.
Document and act
Record pass, marginal or fail per garment. Any defect
over a critical organ requires immediate RPA consultation.
Over Processed Image
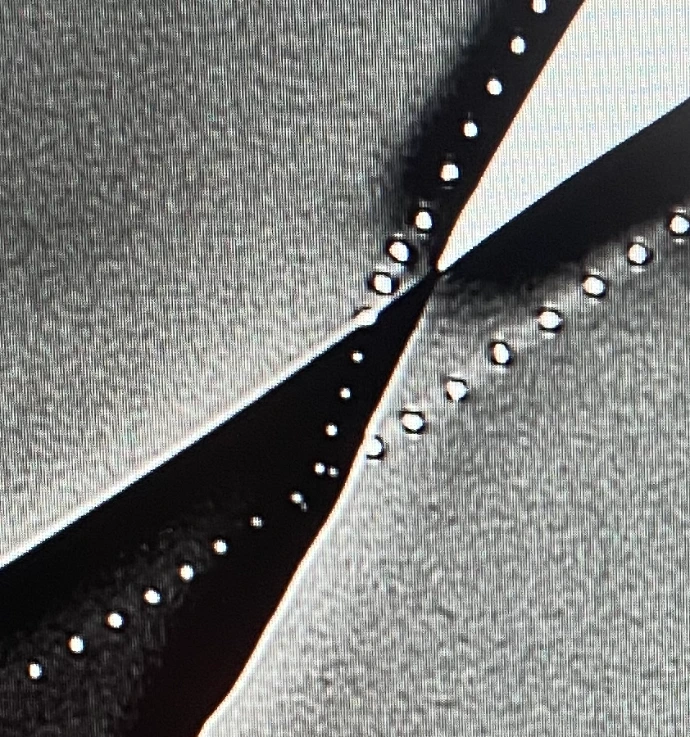
Good Processing
The stitch holes do not look overly bright.

Lead Apron Screening made easy
Lead apron screening can be both time consuming and demanding on imaging designed for diagnostics. Rothband rent out the FLOWD Apron scanner which drastically improves workflow
Section - 05
Rejection Criteria Explained
There is no single national UK rejection standard, criteria should be set locally with your Radiation Protection Adviser. The widely-cited thresholds below provide a practical starting point.
References:
Lambert, K. and McKeon, T. (2001) Inspection of Lead Aprons: Criteria for Rejection. Health Physics, 80, 67-69
Inspection of Lead Aprons: A Practical Rejection Model W. Stam and M. Pillay*
REJECT
Tears >5.4 cm in Length
For a single apron with 0.5 mm lead equivalency, tears exceeding 5.4 cm in length are grounds for rejection. Smaller perforations at edges may also warrant rejection depending on apron dimensions. (Pillay & Stam, Health Physics, 2008)
REJECT
Organ-Specific Size Thresholds
For 0.5 mm single aprons: a tear of just 1.7 cm over the
gonads or 1.8 cm over the thyroid warrants rejection. Defects
near any critical organ require special consideration
regardless of measured size.
REJECT
Defective Closures
Irreparably broken velcro, buckles or ties warrant rejection. A
garment that cannot be properly secured will shift during a
procedure, exposing organs. Attempt repair first; if not
feasible, remove from service.
ACCEPTABLE
Pin Holes at Seams
Manufacturing pin holes at seams are acceptable. Tiny
pinholes away from seams (<0.5 mm, faint, single-layer only)
are generally acceptable. If pinholes exceed 2 mm or appear
multiply, consult your Radiation Safety team.
REJECT
Defects ≥15 mm² Over a Critical Organ
A defect of 15 mm² or greater over a critical organ is grounds
for removal from service. Away from critical organs (seam,
overlapping areas, reverse), the threshold is 670 mm².
(Lambert & McKeon, Health Physics, 2001)
REJECT
Thinning of Core Material
A floppy, comparatively lightweight apron may no longer
provide declared lead equivalency. Assessed using the
greyscale method on X-ray image. Note: front and back LE
may differ, confirm via labels before assessing greyscale
differences.
ACCEPTABLE
Broad Lines / Folds
Wavy broad lines on X-ray are typically folds in the protective
material, not defects. They appear as "more material" due
to path length through the fold. They disappear when the
apron is fully flattened out.
MONITOR
Lead Bunching at Base
Core material may bunch at the bottom seam after
prolonged use. Without cracks or tears, protective
performance is not immediately compromised, but the top
of the apron should be screened for associated tearing at the
upper seams.
≥ 1 X
Annual minimum inspection
≥15 mm²
Critical organ defect rejection
threshold
70–80kV
BIR-recommended screening
tube voltage
>5.4 cm
tears exceeding 5.4 cm in length are grounds for rejection
Section - 06
Storage & Handling Best Practice
The majority of premature apron failures are caused by poor storage and handling, not
normal clinical use.
Avoid These Errors
Never fold aprons, repeated flex stress cracks the internal protective material over time
Never drape over a chair back, trolley rail or narrow hook, even brief periods in a bent position cause damage
Do not use overly harsh chemicals, these can damage the materials. Always follow manufacturers guidance.
Never use a garment that has failed or not yet undergone annual inspection.
Do not allow aprons to be worn by wearers for whom they are too small. Not only is it not protecting properly, it will put stress on the garment.
Avoid leaving aprons on floors or where they may be compressed or walked upon
Best Practice
Hang aprons on a dedicated, wide apron hanger between every use, the single most effective step to extend garment life.
Use correctly sized aprons matched to each wearer to prevent seam stress and premature cracking.
Transport aprons laid flat or gently rolled, never
folded or sharply bent.
Clean regularly using approved products per manufacturer's instructions.
Screen radiographically at least annually and record results per garment.
Allow transport creases to fall out naturally by hanging, they are not defects.
Section - 07
Inventory Management
Effective inventory management is the practical means by which employers meet their obligations under IRR17 to maintain PPE and keep records of examination. Suggestions for criteria used to implement this are outlined below:
Asset Tag ID
Unique identifier assigned at intake can help ensure there is a unique numbering system in place.
Department Assignment
Location and responsible team
Manufacturer & Date
Brand, model and manufacture date
Annual Inspection Results
Pass / marginal / fail with date &
method
Cleaning & Disinfection Log
Dates and method of each deep
clean
Repair History
Nature, date and outcome of any
repair
Lead Equivalence
Front and back LE as labelled
Warranty Status
Expiry date and current status
Disposal Date
Date removed from service with
reason
Need some help with Inventory Tracking?
We have teamed up with CORE RFID, an experienced medical asset tracking application and
developed a bespoke system for managing and x-ray aprons.


Section - 08
A Five-Step Inventory Framework
A repeatable framework reduces staff hours on garment tracking and keeps departments consistently compliant.
Tag Every Garment at Intake
Assign a unique asset tag the moment each apron arrives.
Screen new garments radiographically before first use to establish a baseline and rule out manufacturing defects invisible to the naked eye.
- Record facility, department, description and LE
- Photograph any pre-existing surface marks
- Conduct initial X-ray screen before deployment
Centralise Tracking Across All Departments
Siloed spreadsheets break down when garments move between radiology, cardiology, theatre and endoscopy. A single system creates one authoritative source of truth for all stakeholders.
- Avoid separate spreadsheets per department
- Track location changes in real time
- Enable reporting across the full hospital
Document Annual X-ray Scans
Visual inspection alone cannot reliably identify internal defects. Record the result, method, kV used and assessor for every scan. The quality of documentation matters as much as the scan result itself.
- Note size and location of any defect found
- Cross-reference against organ sensitivity map
Log Cleaning, Disinfection & Repairs
Deep cleaning records must be tied to each garment's asset record. Routine wipe-downs are not equivalent to deep disinfection and must not be recorded as such. Repair records complete the garment's service history.
- Note cleaning product used
- Link repair records to the relevant inspection finding
Plan Replacements, Don't React to Failures
Replacement forecasting, based on garment age, inspection history and repair frequency, keeps budgets predictable and ensures departments are never left short of compliant protection.
- Set expected service life benchmarks by garment type
- Flag garments approaching end of expected life proactively
- Develop a replacement plan to budget effectively